I saw these DIY patio patio lights on Pinterest and really liked them. So I decided to put my own spin on them. The great thing is that all of the components cost less than $5. No water beads this time, but I thought I’d share my creation with you.
Table of Contents
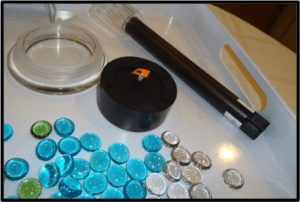
What you’ll need
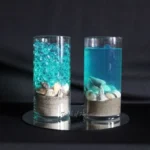
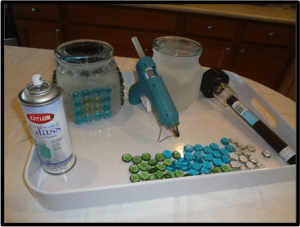
Colored Glass Beads – Found at the Dollar Store for, you guessed it, $1 for each bag of colored glass.
One Quart Jar – Found at Walmart for $3.69. ) Emma Jar with glass lid. (But I bet I could have find it for less)
Outdoor solar light – Found at Wal-Mart for $1.97 it was the simplest one, not a fancier decorative one.
Frosted Glass Finish Spray Paint by Krylon – this cost $5 but you only need a little bit and you can save it for later
Glue – Glass & Bead Adhesive from Michaels
How to make my DIY patio lights “Sun Jars”
- Remove or open the jar lid. Do not spray the lid.
- Using Krylon Frosted Glass spray the inside of the jar using 2 light coats of spray.
- It was easy to twist the plastic stake and plastic covering off the solar light. The part that is left has the solar cell and light. Save the plastic covering and put it back on after the orange tag is removed. It gives a lovely design. Mine was a perfect fit for the lid. I glued it to the lid.
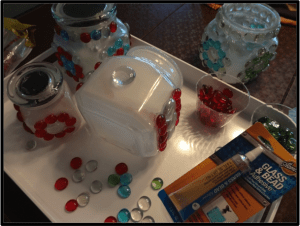
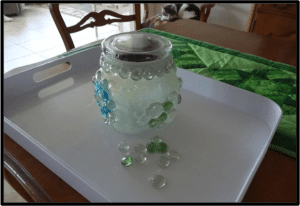
- The fun part is decorating the sides of the jar. I used 3 different colors for my designs. I kept it simple. Glue the glass beads on using the Glass & Bead Adhesive (Aleene’s) It is nice and tacky, but I found I needed to wait at least 30 minutes before I turned the jar and did another side.
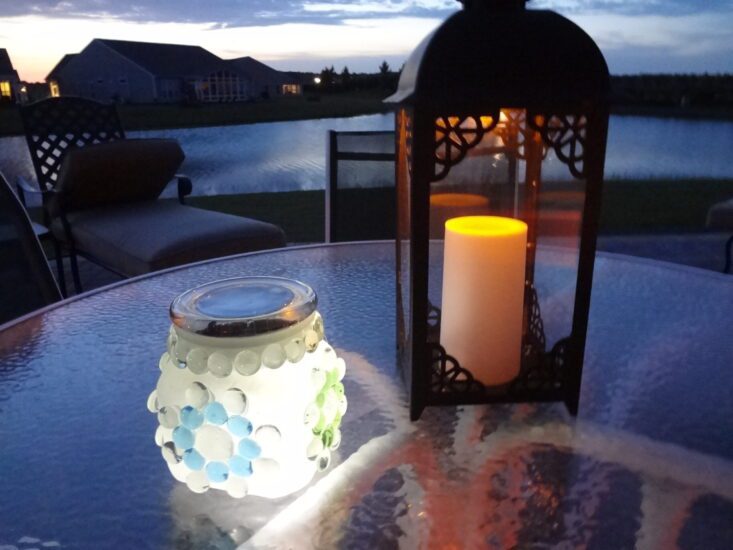
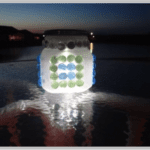
- Place outside in the sun so it can charge during the day. It will be beautiful and glow after the sun goes down. You can also bring them into the house to lighten up a dark room.
The orange tag protects the battery. Pull to remove it when are ready to use
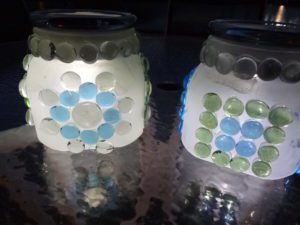
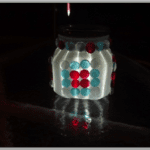
Here’s how they look when finished:
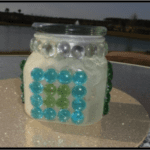
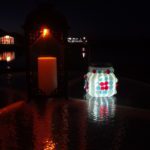
Oops!! I discovered that on the first jar I painted I sprayed it more than recommended and on the outside of the jar. Some of the glass beads have come off. I also used a glue gun. I would now recommend you spray the inside of the jar or lightly sand the outside to give it a frosted look and also use an adhesive made for glass.
Use a glass adhesive not a glue gun
Why DIY Patio Lights?
DIY patio lights are a great way to personalize your outdoor space while saving money. Store-bought lighting can be pricey, and it often lacks the unique charm that handmade decorations offer. By opting for DIY projects, you can tailor your lights to match your style and needs, and you’ll be proud of the fact that you made them yourself.
Materials You’ll Need
To create your own patio lights, you’ll need a few basic materials that are both affordable and easy to find. Here’s what you’ll need:
- Mason Jars: You can often find mason jars at thrift stores or dollar stores for under $1 each.
- Tea Light Candles: These are inexpensive and available at most supermarkets or dollar stores.
- String Lights: Look for inexpensive battery-operated string lights, which can be found at discount stores.
- Wire or Twine: For hanging your jars. A roll of wire or twine is typically less than $2.
- Paint or Decorative Items (Optional): To personalize your jars, you might use paint, stickers, or other decorative items.
Simple DIY Projects
Here are a few easy and creative projects you can undertake to make your patio shine:
1. Mason Jar Lanterns
Materials:
- Mason jars
- Tea light candles
- Wire or twine
- Paint (optional)
Instructions:
- Decorate the Jars: If you want to add a splash of color or design, use paint or stickers to decorate the outside of your mason jars. Let them dry completely.
- Insert the Tea Light Candles: Place a tea light candle in the bottom of each jar.
- Add Hanging Wire: Cut a piece of wire or twine about 18 inches long. Wrap it around the top of the jar, twisting the ends to secure it. This will create a handle for hanging.
- Hang and Enjoy: Find a spot to hang your mason jar lanterns. They can be hung from tree branches, hooks, or even shepherd’s hooks.
2. String Light Jars
Materials:
- Mason jars
- Battery-operated string lights
- Decorative elements (optional)
Instructions:
- Prepare the Jars: Clean and dry your mason jars.
- Insert String Lights: Gently place the string lights inside the jars, arranging the bulbs so they are evenly distributed. You may need to adjust the battery pack to fit through the jar opening.
- Add Decorations (Optional): You can place decorative items like beads or faux flowers inside the jar with the string lights for added flair.
- Display Your Lights: Place the jars on tables, shelves, or hang them for a whimsical effect.
3. DIY Lanterns with Cans
Materials:
- Empty tin cans
- Hammer and nail
- String lights
- Paint (optional)
Instructions:
- Prepare the Cans: Remove the labels and thoroughly clean the cans.
- Create Holes: Use a hammer and nail to create holes in the can’s sides for a lantern effect. You can create a pattern or leave them as simple dots.
- Insert String Lights: Place the string lights inside the can. Adjust the placement so the lights are visible through the holes.
- Decorate (Optional): Paint or decorate the outside of the can for a personalized touch.
- Display: Set your DIY lanterns around your patio or hang them using wire.
Tips for Success
- Safety First: If using candles, always monitor them while they are lit and never leave them unattended. Battery-operated lights are a safer alternative.
- Weather Considerations: Ensure that your lighting materials can withstand outdoor conditions. Opt for waterproof options or keep them sheltered if needed.
- Experiment and Customize: Feel free to mix and match different materials and designs to find what works best for your space.
Maintenance and Care
To keep your DIY patio lights looking their best, regularly check for any damage or wear. Clean the jars or cans as needed to maintain their appearance. If using candles, replace them as they burn out to ensure continuous lighting.
Conclusion
Creating DIY patio lights for less than $5 is not only budget-friendly but also allows you to add a personal touch to your outdoor space. Whether you choose mason jar lanterns, string light jars, or tin can lanterns, these projects are simple and fun to make. With just a few inexpensive materials, you can create a magical atmosphere that will enhance your patio’s charm and make it a favorite spot for relaxation and gatherings. So gather your supplies, get creative, and light up your patio with style!

Jessica Muller is an accomplished writer at Water Beads Design, holding a Bachelor’s degree in Fine Arts with a focus on Design and Visual Communication. Her expertise in water bead artistry is backed by over 5 years of experience in the field, where she has developed a deep understanding of artistic techniques and design trends. Jessica’s writing reflects her extensive knowledge and creative approach to water bead design. For professional tips and innovative ideas, follow Jessica on Instagram.