Elegant and interesting wedding centerpieces don’t have to cost you a fortune. I’ve made several in the past couple weeks that have turned out great and cost less than $15 to make. Watch my video below for some great DIY wedding centerpieces.
Planning a wedding can be both exciting and overwhelming, especially when it comes to choosing the perfect decorations. One budget-friendly and creative option that’s gaining popularity is using water beads to make stunning DIY wedding centerpieces. In this guide, we’ll explore how to create beautiful wedding centerpieces with water beads, providing you with step-by-step instructions and tips to ensure your special day is both memorable and unique.
Table of Contents
Why Choose Water Beads for Wedding Centerpieces?
1. Budget-Friendly: Water beads are an affordable alternative to traditional floral arrangements and other decorative elements. A small package of dry beads can expand into a large quantity, making them a cost-effective choice for decorating multiple tables.
2. Easy to Work With: The process of preparing and using water beads is straightforward. With just a few basic steps, you can transform these tiny beads into beautiful, eye-catching centerpieces.
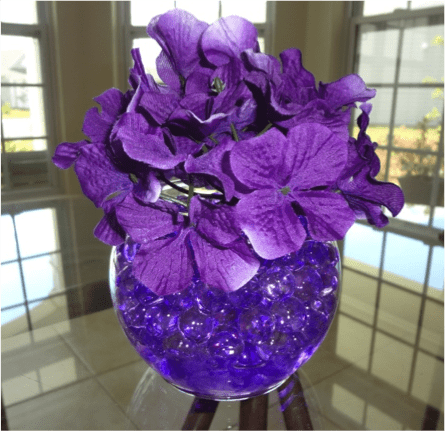
3. Customizable: Water beads come in a variety of colors, allowing you to match them with your wedding theme and color palette. You can also combine different colors to create a unique and personalized look.
4. Low Maintenance: Unlike fresh flowers, water beads require minimal upkeep. Once hydrated, they maintain their appearance throughout the event without the need for daily watering or care.
How to Create DIY Wedding Centerpieces with Water Beads
Creating your own wedding centerpieces with water beads involves a few simple steps. Follow this guide to make beautiful and memorable centerpieces that will impress your guests.
Materials Needed:
- Water beads (available at craft stores or online)
- Containers (vases, jars, bowls, or any decorative vessel)
- Submersible LED lights (optional, for added ambiance)
- Decorative elements (flowers, candles, or other embellishments)
- Water
Step 1: Hydrate the Water Beads
Start by hydrating the water beads. Place the dry beads in a large bowl or container and cover them with water. Follow the instructions on the package for the recommended amount of water. Allow the beads to soak for several hours or overnight. As they absorb the water, they will expand to several times their original size.
Step 2: Prepare Your Containers
While the water beads are soaking, prepare your containers. Choose containers that complement your wedding theme and table setting. Vases, jars, and bowls are popular choices. If you want to add a touch of sparkle, consider using glass or acrylic containers that will highlight the water beads.
Step 3: Add Submersible LED Lights (Optional)
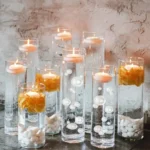
For a magical effect, you can place submersible LED lights at the bottom of the containers before adding the water beads. These lights will illuminate the beads from within, creating a beautiful and enchanting glow. Make sure the lights are waterproof and suitable for use in water.
Step 4: Fill Containers with Water Beads
Once the water beads have fully expanded, gently drain any excess water. Carefully fill your containers with the hydrated beads, ensuring an even distribution. If you’re using multiple colors, you can create layers or mix them together for a more vibrant effect.
Step 5: Add Decorative Elements
To enhance your centerpieces, add decorative elements such as fresh or artificial flowers, candles, or small figurines. For a classic look, place a floating candle on top of the water beads. Alternatively, you can arrange flowers or greenery to create a floral centerpiece with the beads as a colorful base.
Step 6: Arrange the Centerpieces
Place your finished centerpieces on the wedding tables. Ensure they are positioned in the center and are visible to all guests. If you’re using multiple centerpieces, consider varying the container sizes or decorative elements to create visual interest.
Step 7: Enjoy Your Beautiful Centerpieces
Your DIY water bead centerpieces are now ready to be admired by your guests. Enjoy the elegant and unique look they bring to your wedding day. The water beads will continue to look stunning throughout the event, providing a lasting impression of your special day.
Tips for Perfect DIY Water Bead Centerpieces
- Color Coordination: Choose water bead colors that match your wedding theme or color palette. You can find beads in a wide range of colors, from soft pastels to vibrant hues.
- Testing: Before the big day, test your centerpieces to ensure they look as expected. Check for any issues with the beads or decorations and make adjustments as needed.
- Quantity: Plan for the number of centerpieces you need based on your guest tables. Be sure to have enough water beads and containers to accommodate all tables.
- Storage: Store unused water beads in a cool, dry place. They can be reused for future events or craft projects if properly dried and stored.
Conclusion
DIY wedding centerpieces made with water beads are an innovative and cost-effective way to create stunning decorations for your special day. With their versatility, ease of use, and customizable options, water beads offer a creative solution for making beautiful centerpieces that will impress your guests and add a touch of elegance to your wedding. By following these simple steps and tips, you can craft your own unique centerpieces and enjoy a memorable wedding celebration.

Jessica Muller is an accomplished writer at Water Beads Design, holding a Bachelor’s degree in Fine Arts with a focus on Design and Visual Communication. Her expertise in water bead artistry is backed by over 5 years of experience in the field, where she has developed a deep understanding of artistic techniques and design trends. Jessica’s writing reflects her extensive knowledge and creative approach to water bead design. For professional tips and innovative ideas, follow Jessica on Instagram.